Voice Changer Software, Voice morpher, voice effects, voice changing software tutorials - Audio4fun Support Center
RSS: AV Voice Changer Software Diamond
 http://support.audio4fun.com/update-log?format=feed&type=rss
Publisher: AVSoft Corp.
Voice Changer Software, Voice morpher, voice effects, voice changing software tutorials - Audio4fun Support Center
This tutorial is a complete Guide helps you to get through the installation and activation of AV CD Grabber.
{step}
{title}Step 1: Ready with Installation File{/title}
{body}
Click here to troubleshoot the download.
Note: Trial user can download installation file on our homepage or some other trusted pages. {/body}
{step}
{title}Step 2: Installation Process{/title}
{body}
Go to destination folder of the downloaded file >> Double-click on it or Right-click then Open to run the installation file.

Welcome Screen and initial warning >> Click Next.

License Agreement >> Choose I Accept the terms of the License Agreement to affirm that you have read and agree to our terms >> Click Next.

Destination Location >> Click Next if you want to leave it as default.
Otherwise, choose Browse… (1) then locate the folder you wish to store installed data >> Click Install to start installation.

Wait while the installation is in the progress.

Click Finish to complete. Now, CD Grabber has been successfully installed on your computer.
Check on Run AV CD Grabber 1.0.4 if you want to try out the program immediately.

{/body}
{step}
{title}
Step 3: License Registration{/title}
{body}
Run CD Grabber, a pop-up ask for Activation code will come out.

* Activate Free version:
After run CD Grabber, a pop-up will appear to ask for Activation Code. Follow the instructions to activate the program for FREE.
Follow the "Click here" link to get the free activation code from www.audio4fun.com website.
Paste the activation code into the box and hit the Submit button.

Activation is complete.

* Upgrade to Pro version:
Go to Help icon >> select Activate PRO Version command to open Activate the PRO features window.

Fill in your license information (*) >> Select CD Grabber in PRO feature drop list >> Click Activate.

(*) Click here to learn how to access your license information.
Now you’ve done. It is required to restart the program before you can get it into use.

Run CD Grabber >> go to Help icon to check if the program has been fully activated.

***Note: You also access Activate the PRO feature window by go to Start >> All Program >> AV Media Player Morpher folder >> License Manager.

Note:
If you are a newbie, please refer to our FAQs here.
{/body}
Music tagging is a necessary task which will support music organizing by classifying your music library into various categories. Also, music tagging is important because tags are how a song is indetified and displayed by your music player.
Following this tutorial, you will learn how to auto-apply tags from the online database MusicBrainz.org to ripped tracks with AV CD Grabber. Instead of googling a song’s information one by one, you can now import all tags at a time.
{step}
{title}Step 1: Simplify the CD ripping task{/title}
{body}
This 4-step tutorial will get you through how to extract your favorite songs from a CD using AV CD Grabber.
{/body}
{step}
{title}Step 2: Auto-tag output files{/title}
{body}
- Click Get from Internet to get tag info from online databases.
- Type in the any word of the Album title and click Next to search.

- Then select the appropriate one from the results and click Next.

- Up or Down a track to change its order to match the info on the right panel » Click Finish to complete.

Now, the info has been applied to all the tracks in the album.

Note: You can select a song and hit Extended Tags for further information of that song.
And that’s it; you have finished importing info from MusicBranz.org straight to the ouput ripped files.
{/body}
This tutorial will show you how to take advantage of AV CD Grabber to rip songs from your favorite Christmas CD and share them with friends as jolly holiday gifts.
{step}
{title}Step 1: Insert disk and select songs for ripping{/title}
{body}
- Insert your favorite Christmas disk into the CD-ROM Drive
- Click on Open disc icon to import songs from CD.
![]()
By defaut, CD Grabber will launch and list all the CD’s tracks on main window.
Select the songs you want remove from the ripping list with Remove selected button.
{/body}
{step}
{title}Step 2: Choose output directory{/title}
{body}
In Destination section:
You can leave the path in Folder option as default.
Otherwise, choose Browse… then locate the folder you wish to save the songs.

{/body}
{step}
{title}Step 3: Determine output format{/title}
{body}
In Encoding Settings section:
Click Extension » Choose output format from the drop down list.

You can also select appropriate Sample rate, Channels, Bits per sample, or Additional options for the output files.
Note: Before the conversion starts, you are asked to select Sound Format. Just leave them as default by choose in Extension if you do not sure what to do. Any wrong selection in this step may cause the output quality worse than expected.

{/body}
{step}
{title}Step 4: Start Grabbing{/title}
{body}
Click on Grab button to start ripping.

You can follow the ripping progress, indicated by the Total (2) progress bar - an overall progress, and Current Track (1) ripping status.

- Click Cancel button if you want stop the process.
- After finishing the process, click Close button to close Conversion log and listen to output files with AV Media Player Morpher (optional).

Now your favorite Christmas songs are safely stored on hard disk. Send them to your friends right away or you can add some more creativity before gifting them. {/body}
AV CD Grabber is a PC software program that helps to convert tracks on a music CD to standard computer audio files for hard disk backup or for mobile devices.
It features the great performance with high quality outputs and advanced options for optimizing your music management, including creating a name template for the entire album after ripped.
This tutorial will help you in ruling the output name in your favorite arrangement regardless of the number of ripped songs at a time.
{step}
{title}Step 1: Simplify the CD ripping task{/title}
{body}
This 4-step tutorial will get you through how to extract your favorite songs from a CD using AV CD Grabber. {/body}
{step}
{title}Step 2: Apply name template to output files{/title}
{body}
Song tags are required for naming the output files. Click here to learn how to auto-tag the entire song list.
In Output file naming section:
- Click Change to open Output files naming rule dialog box.

- Click Insert to add tag entries to the name template according to your desired order. Preview the output names of currently listing tracks in the table below.

Note:
- Edit the displayed output names right in the template bar.
- Separate each tag with the others by the common symbols.
Ex: Template: (%album% - %album_artist%) %title%
» Output Name: (Red - Taylor Swift) Begin Again.
- Choose Presets for ready-to-use name templates.

Now you have finished setting name template for the output files. Continue with your ripping task and the ripped file will be named in the most effective way that makes your music library managing thousand times easier.
{/body}
Click on the Customer Login link on the top-right of the Audio4fun Support Center page to open the login panel as per below image. You will need to enter your username and password to able to access the customer zone.
Note: The Username and Password is always sent to your email address on Order completed.
If you cannot find it, please feel free to contact our support here.

As soon as you are logged in, you are redirected to the Your License page. From here, you will easily navigate all of your purchased licenses and as well as license status.
Click on the license link and you will reach the detailed page with download link and Serial Number.

Click on the Customer Login link on the top-right of the Audio4fun Support Center page to open the login panel as per below image. You will need to enter your username and password to able to access the customer zone.
Note: The Username and Password is always sent to your email address on Order completed.
If you cannot find it, please feel free to contact our support here.

As soon as you are logged in, you are redirected to the Your License page. From here, you will easily navigate all of your purchased licenses and as well as license status.
Click on the license link and you will reach the detailed page with download link and Serial Number.

INTRODUCTION
An Orc (pronounced /ˈɔrk/) is one of a race of mythical human-like creatures, generally described as fierce and combative, with grotesque features and often black, grey or greenish skin. This mythology has its origins in the writings of J. R. R. Tolkien.
These creatures have since become popular figures in other fantasy and science fiction literature as well as many types of fantasy games. While some writers portray orcs as large, misshapen humanoids who are brutal and warmongering, others works, such as those in the Warcraft universe, describe them as a proud warrior race with a strong sense of honor. They are variously portrayed as physically stronger or weaker than humans, but always high in numbers.
This tutorial is going to show you how to change or convert any human voice into the a non-human voice - An Orc (World of Warcraft) voice with AV Music Morpher Gold 5.0. Within this page, you will learn how to make Micheal Douglas speak in the Orc way.
Preview sample
- Click here to see how the Orcs sound like.
- Click here to listen to Michael Douglas original voice sample .
- Click here to listen to how Michael Douglas would sound like after effects.
{step}
{title}STEP 1: Load the Michael Douglas voice into Morpher module of Music Morpher Gold {/title}{body}
- Start the Music Morpher Gold program and switch to the Morpher module
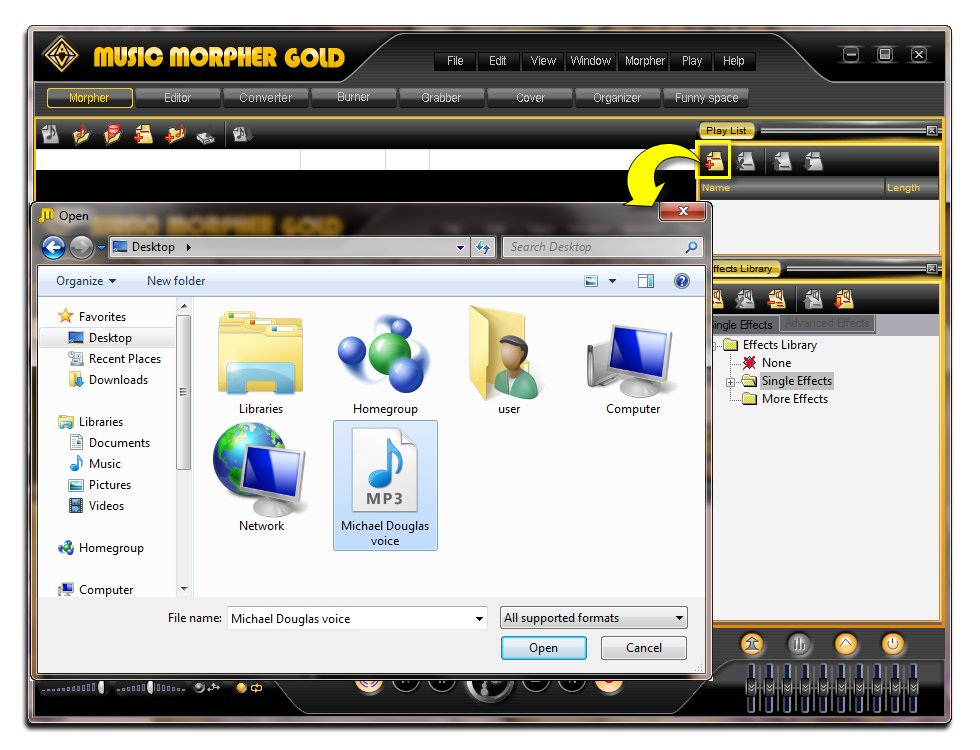
- Within the Play List pane, click on the Open File button to browse and to load the Michael Douglas voice into the Morpher's playlist.
{/body}{step}
{title}STEP 2: Modify and Convert the sample file {/title}{body}
Modify and preview the setting
• Select the clip and click on the Play (1) button on the Player panel to listen the voice.
• Within the Voice Morpher (2) click on the On/off button (3) to enable the Voice Morpher
• From now on, you can slowly and slightly move adjust the Pitch and Timbre to the left or to the right to archive the Orc voice. For me, 75% in Pitch and 69% in Timbre is nice already. So, I mark it down.
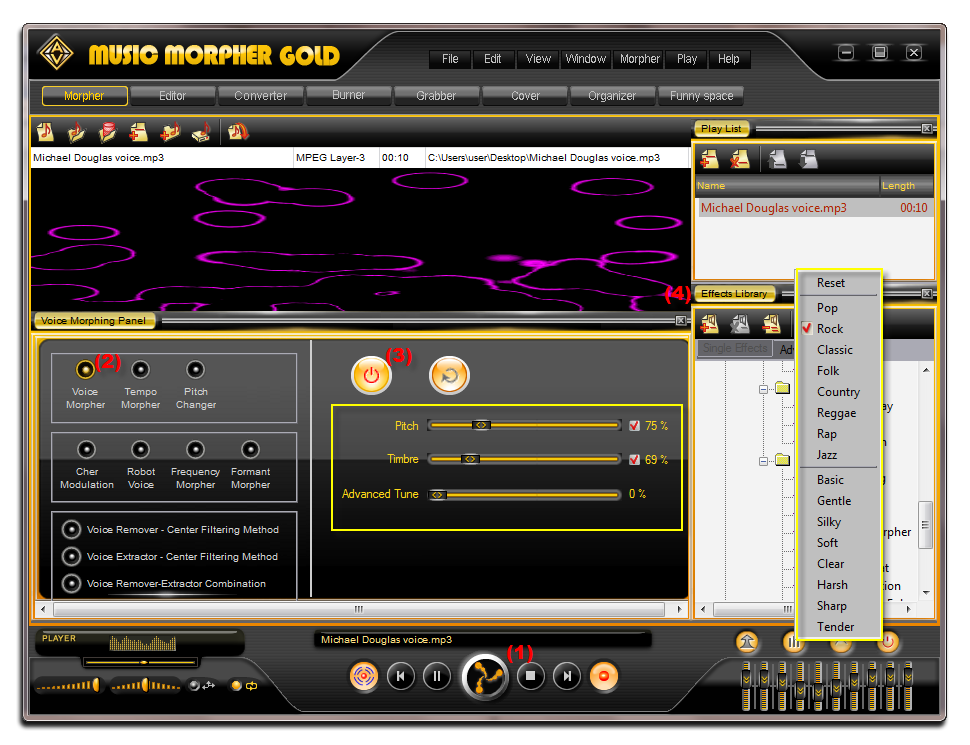
- In this tutorial, we'd recommend you to try the Equalizer Presets for a little more enhancing the output result. Besides that, you can always try more with the built-in Effects Library (4) comes with Music Morpher Gold 5.x.
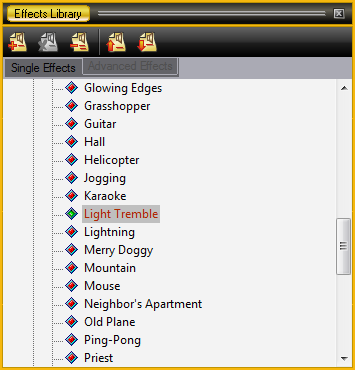
- For more special voice you add more effects Light tremble, Sticky, Tunnel in Single Effects Tab
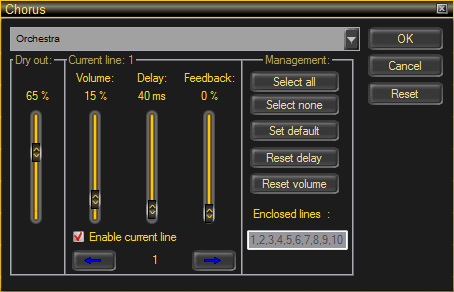
- And effect Chorus in Advanced Effects Tab
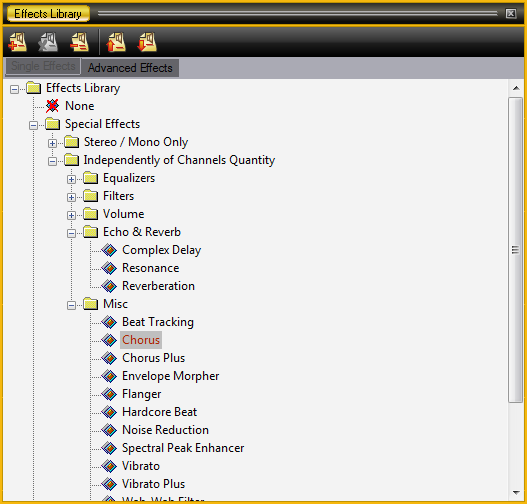
- For more setting double click in Chorus
Save output file
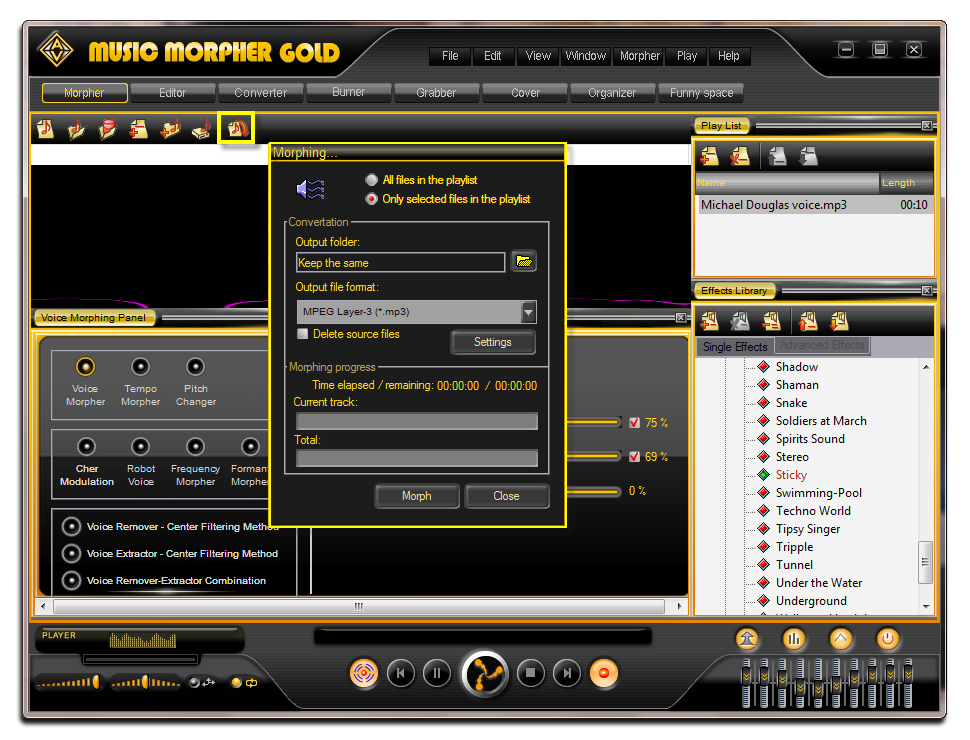
- As soon as you reach your desired result, you can start the converting by clicking on the Morph Selected Files button on the Morpher Menu.
- Within this step in Music Morpher Gold 5.0, you are able to save the output result in various types and formats like .ogg, .mp3, .wav, .flac, .ape, etc.
{/body}
INTRODUCE
AV Music Morpher Gold is an all-in-one music editor, which helps you cut, copy, paste, edit and mix your songs for remixes, medleys, ringtones, etc. The program makes detailed audio edits a snap. It is packed full of powerful features including a multi-track recorder and editor, a whole suite of professional effects and our famous patented vocal remover-extractor. It turns your humble PC into a fully-fledged recording studio giving you the power to make your own pop songs, funky remixes or even backing tracks quickly in the comfort of your own home and more.
This tutorial is going to show you how to change a song into a chipmunk song with Music Morpher Gold 5.0.
Preview sample
Click here to listen to the original short-clip of Careless Whisper (George Michael)
Click here to listen to the chipmunk version
STEPS
{step}
{title}STEP 1: Open the song with Morpher module {/title}{body}
- Start the Music Morpher Gold program
- Switch to the Morpher module
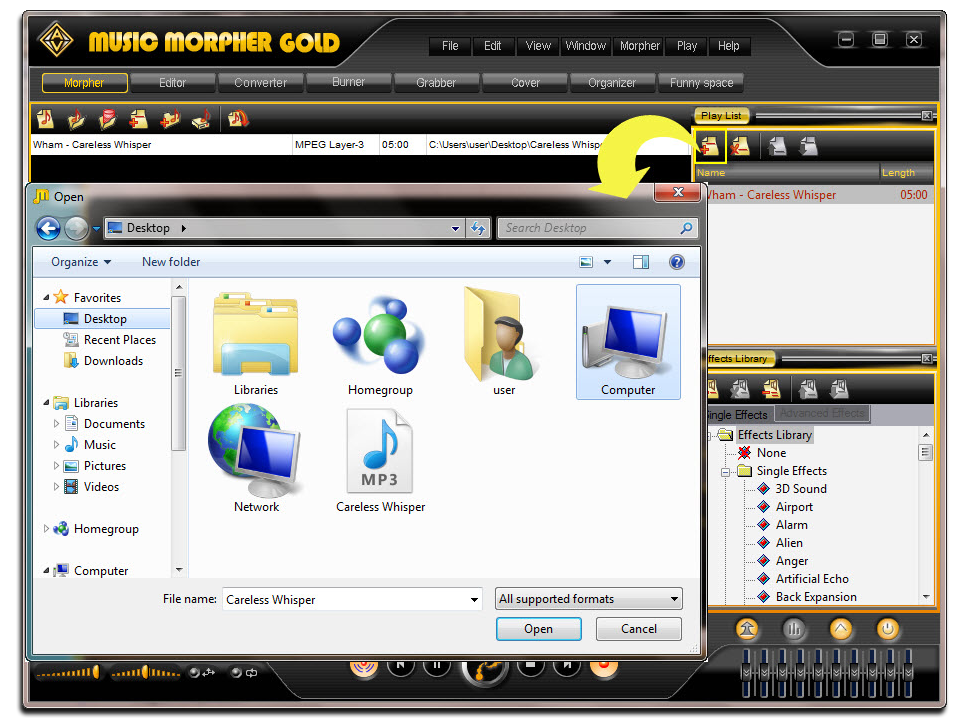
- Within the Play List pane, click on the Open File button to browse and to load the song into the Morpher's playlist
{/body}
{step}
{title}STEP 2: Play the song and morph file {/title}{body}
Preview the setting
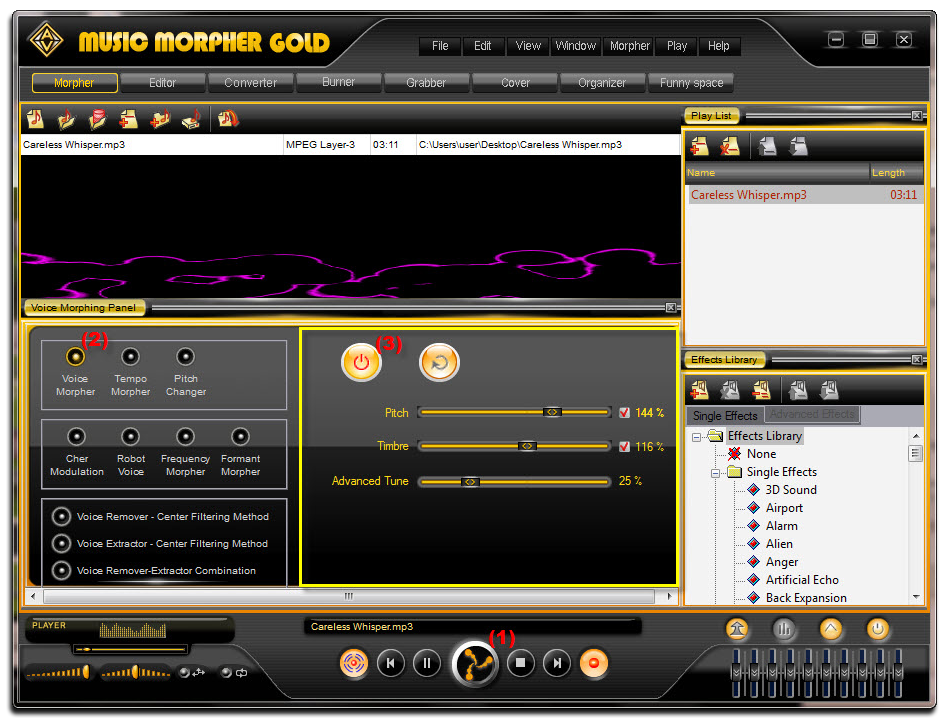
• Click Play (1) button on the Player panel to listen the song .
• Remember to click on the Voice Morpher (2) and turn on Effects (3) to begin morph song.
• Move the cursor on the Pitch and Timbre graph to change the voice like chipmunk.
=> Setting the voice same as Chipmunk, you can select Pitch is 144% and Timber is 116 %
Save output file
- Press Morph Selected Files button on the Morpher Menu.
- The Morphing dialog appears. Select the Output Folder and the Output File Format, then click Morph button to start the morphing process.
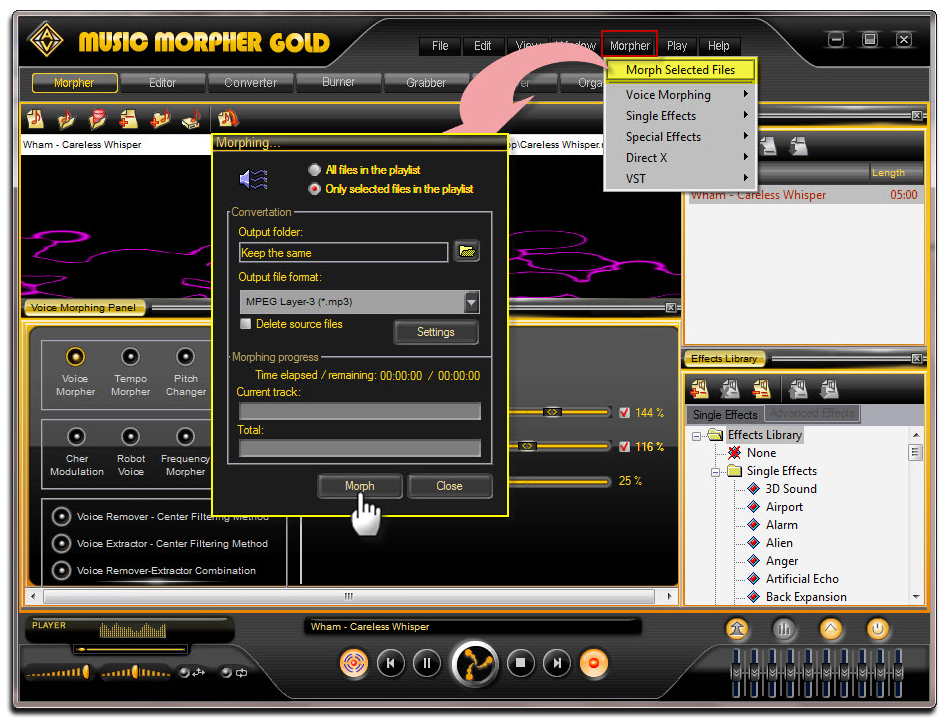
Note: Before processing you are asked to select Sound Format. Just leave them as default by clicking OK button if you do not sure what to do .
{/body}
INTRODUCTION
Counter-Strike (sometimes differentiated as Counter-Strike 1.6 and shortened to CS) is a tactical first-person shooter video game developed by Valve Corporation which originated from a Half-Life modification by "Gooseman" and Jess "Cliffe" Cliffe. The game has been expanded into a series since its original release, which currently includes Counter-Strike: Condition Zero, Counter-Strike: Source, and Counter-Strike: Global Offensive. Counter-Strike pits a team of counter-terrorists against a team of terrorists in a series of rounds. Each round is won by either completing the mission objective or eliminating the opposing force.
The game was the most played Half-Life modification in terms of players, according to GameSpy in 2008.

The new version of AV VoizGame has a Virtual Audio Driver ( Avnex Virtual Audio Device) which works as a virtual audio & sound device. This device can be used with any VoIP, Instant Messenging applications, or online voice chatting or web conferencing websites for changing voice and/ or recording in real-time. By setting AVnex Virtual Audio Device as default audio driver for microphone in those applications, you will be able to control your voice tone and speak the way you want.
In this tutorial, we will guide you on how to apply AV Voizgame to change voice while communicating in Counter Strike.
{step}
{title}Step 1: Make sure your VoizGame is on VAD mode{/title}
{body}
On VoizGame main panel, Click Settings to open the VoizGame Settings dialog box

In the VoizGame Settings dialog box, we will switch from HookMode to Virtual Audio Driver (VAD) Mode:
- Check on VadMode (1).
- Click OK (2) to apply new setting and close VoizGame Settings dialog box.

{/body}
{step}
{title} Step 2: Change audio settings in Counter Strike Game {/title}
{body}
- To learn how to work with Steam’s settings, click here.
{/body}
{step}
{title} Step 3: Start a voice conversation via Counter Strike with the new voice {/title}
{body}
You can now start voice chatting on Counter Strike.
Please notice that as long as the AV Voizgame is On, the morphing effects will be applied to your voice automatically. To be back to normal instantly, you will just need to turn the voice changer software off.
{/body}
INTRODUCTION
Optimus Prime is a fictional character from the Transformers franchise. Prime is the leader of the autobots, a faction of transforming robots from the planet Cybertron. The autobots are constantly waging war against a rival faction of transforming robots called Deceptions. He is depicted as a brave, powerful, wise and compassionate leader who puts his talent to use improving the universe around him. Optimus is portrayed as having a strong sense of justice and righteousness and has dedicated himself to the protection of all life, particularly the inhabitants of Earth.
In this tutorial, we will guide you on how to talk like the Optimus Prime Robot with Voice Morpher and Equalizer of the AV VoizGame
{step}
{title} Step 1: Basic voice changing with the Pitch and Timbre graph {/title}
{body}
- On the main panel, click on the On/off (1) button turn on the VoizGame panel.
- Move the cursor (2) on the Pitch-Timbre graph (also called the Morpher graph) to change the voice.
- For me, Pitch is 66% and Timbre is 95 % make me sound like Optimus most. So, I leave the cursor there.
Note: because each voice is characterized on pitch and timbre, it is recommended that you should try more or less to archive your most favorite pitch and timbre parameters to sound like Optimus robot most.

In the next step, you will learn on how to take advantage of one of most powerful voice effects in VoizGame - The Equalizer .
{/body}
{step}
{title} Step 2: Enhance the output voice with equalizer {/title} {body}
- Expand the Advanced effects panel .
- Click on the On/Off (1) button to turn the Equalizer on
- Make change to each slider (2) at a time while speaking into the mircrophone to pre-listening to how you sound like.
- For me, I'd recommend the below parameter.

- For instant use, you can download the Optimus Prime Robot voice preset from here.
- To learn how to use the preset of voice changer software, click here.
{/body}